JModelica Docker
Getting the JModelica emulator docker image
Note. The following procedures are related to Mac OS and Ubuntu.
Once Docker desktop is installed on the host computer, to get access to the JModelica container, one could follow the steps below. Details on the Docker commands can be found on the Docker documentation page.
- Open a terminal window.
- At the terminal prompt type
docker pull laurmarinovici/building_control_emulator:latest
The docker image will be downloaded on the host computer.
- To inspect the Docker images downloaded type
docker images
should return a list of Docker images, which should include something similar to
- To instantiate the Docker container, run
docker run -it --rm -p="127.0.0.1:5000:5000" \
         --mount type=bind,source=<path to host computer folder to bind with container folder>,destination=<path to folder in the container bound to host folder> \
         --network=host --name=<container name> <image name> bash

Normally, the host computer folder bound to a folder within the container would be the folder that contains the models and the running scripts (developed or downloaded from the github repository).
- Once the container has been created, it should show up listed when running
docker ps -a
Inside the JModelica Docker container
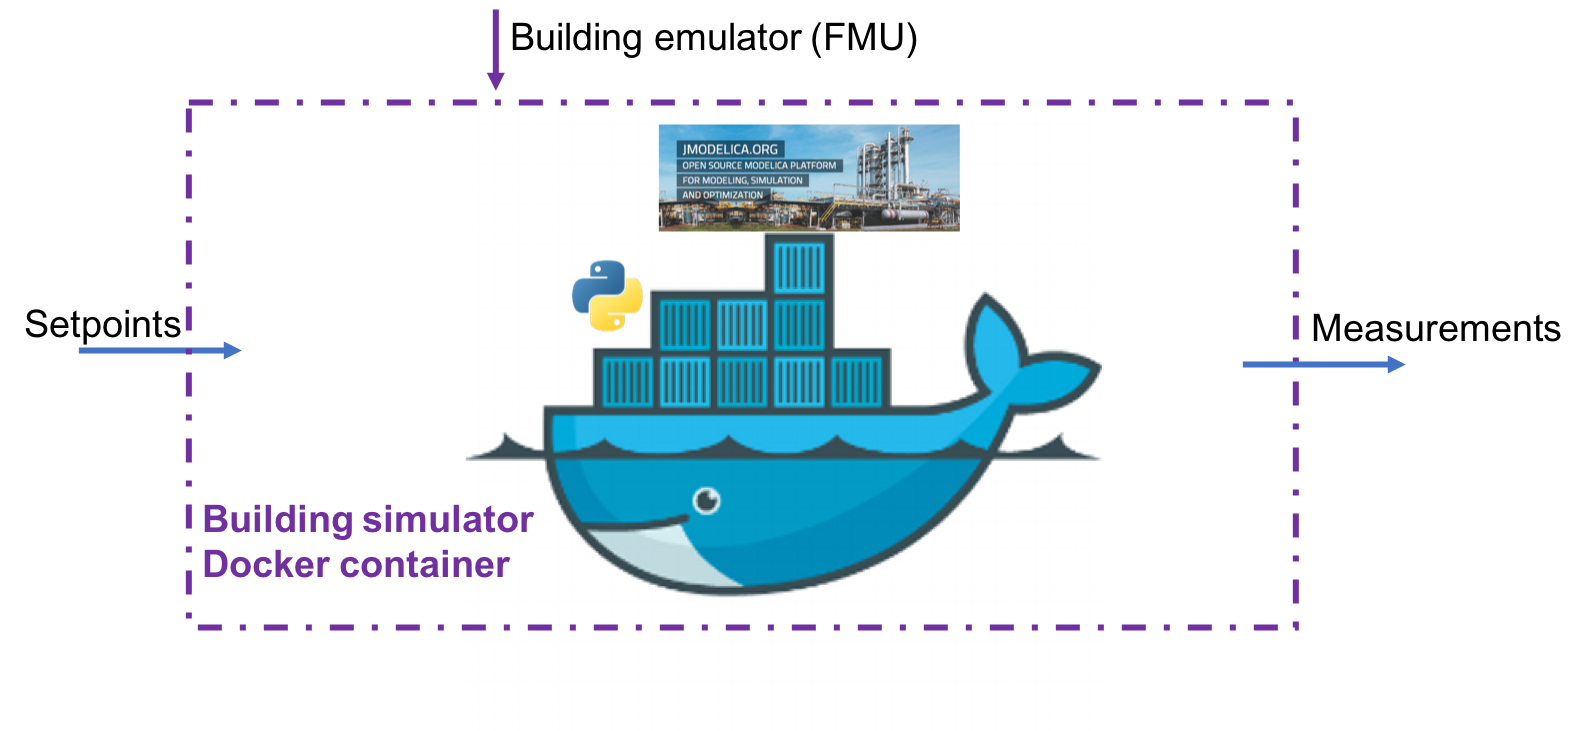
Figure 1. Emulator Docker diagram
JModelica Docker container is build on an Ubuntu distribution version 16.04.6 LTS (Xenial Xerus). It contains `JModelica`_ and the neccessary Python modules:
- PyModelica - for compiling Modelica models intu FMUs
- PyFMI - for loading and interacting with the FMU representing the building emulator
Inside the JModelica Docker container, the building emulator is loaded and simulated/controlled using a REST (REpresentational State Transfer) API.
Class emulatorSetup has been implemented to define the REST API requests to perform functions such as advancing the simulation, retrieving test case information, and calculating and reporting results.
Code documentation - emulatorSetup.py
Acquire the list of inputs the emulator accepts as control signals
The emulator inputs are pairs of 2 values for each control signal:
- <name>_activate - that can take 0 or 1 values indicating that particular input is going to be used for control with the given value rather than the default value
- <name>_u - that represents the actual input value that the control designer calculates
- class
emulatorSetup.emulatorSetup(fmuPath, fmuStep)¶Class to setup the building emulator (FMU) simulation.
get_inputs()¶Returns a list of control input names.
Parameters: None – Returns: inputs – List of control input names. Return type: list
- Acquire the list of measurements exposed by the emulator
- class
emulatorSetup.emulatorSetup(fmuPath, fmuStep)Class to setup the building emulator (FMU) simulation.
get_measurements()¶Returns a list of measurement names.
Parameters: None – Returns: measurements – List of measurement names. Return type: list
- Advance the emulator simulation one step further after providing a set of control inputs to it with
- class
emulatorSetup.emulatorSetup(fmuPath, fmuStep)Class to setup the building emulator (FMU) simulation.
advance(u)¶Advances the test case model simulation forward one step.
Parameters: u (dict) – Defines the control input data to be used for the step. {<input_name> : <input_value>} Returns: y – Contains the measurement data at the end of the step. {<measurement_name> : <measurement_value>} Return type: dict
- Obtain the name of the emulator
- class
emulatorSetup.emulatorSetup(fmuPath, fmuStep)Class to setup the building emulator (FMU) simulation.
get_name()¶Returns the name of the FMU being simulated.
Parameters: None – Returns: name – Name of FMU being simulated. Return type: str
- Obtain the simulation time step in seconds
- class
emulatorSetup.emulatorSetup(fmuPath, fmuStep)Class to setup the building emulator (FMU) simulation.
get_step()¶Returns the current simulation step in seconds.
- Set the simulation time step in seconds
- class
emulatorSetup.emulatorSetup(fmuPath, fmuStep)Class to setup the building emulator (FMU) simulation.
set_step(step)¶Sets the simulation step in seconds.
Parameters: step (int) – Simulation step in seconds. Returns: Return type: None
- Obtain full trajectories of measurements and control inputs
- class
emulatorSetup.emulatorSetup(fmuPath, fmuStep)Class to setup the building emulator (FMU) simulation.
get_results()¶Returns measurement and control input trajectories.
Parameters: None – Returns: Y – Dictionary of measurement and control input names and their trajectories as lists. {‘y’:{<measurement_name>:<measurement_trajectory>}, ‘u’:{<input_name>:<input_trajectory>}} Return type: dict
- Obtain key performance indicator (kpi)
- class
emulatorSetup.emulatorSetup(fmuPath, fmuStep)Class to setup the building emulator (FMU) simulation.
get_kpis()¶Returns KPI data.
Requires standard sensor signals.
Parameters:
- None –
- Returns –
- kpi (dict) – Dictionary containing KPI names and values. {<kpi_name>:<kpi_value>}
Script startREST instantiate the building emulator by loading the desired FMU file and setting up the length of the time interval (in seconds) for which the emulator will run until finishing or being interrupted to receive an external control action. It also opens up the communication channels through which HTTP requests can be made to access the building emulator. The scripts should be called using:
python startREST.py -p ./models/wrapped.fmu -s 60
or
python startREST.py --fmuPath=./models/wrapped.fmu --fmuStep=60
Code documentation - startREST.py
- class
startREST.Advance(**kwargs)¶Interface to advance the test case simulation.
post()¶POST request with input data to advance the simulation one step and receive current measurements.
- class
startREST.Inputs(**kwargs)¶Interface to test case inputs.
get()¶GET request to receive list of available inputs.
- class
startREST.Measurements(**kwargs)¶Interface to test case measurements.
get()¶GET request to receive list of available measurements.